

1 Cover a Broken Car Glass
Introduction
Accidents happen, and one of the unfortunate consequences can be a broken car glass. Whether it’s a cracked windshield or a shattered side window, a broken car glass can be both inconvenient and potentially dangerous. While it’s always recommended to seek professional help for car repairs, there are some temporary measures you can take to cover a broken car glass using basic home tools. In this article, we will guide you step by step on how to cover a broken car glass until you can get it properly repaired.
Firstly, it’s important to assess the extent of the damage. Is it a small crack or a completely shattered window? This will determine the type of temporary solution you should use. If it’s a small crack, you may be able to repair it yourself using a windshield repair kit. These kits are readily available at automotive stores and come with detailed instructions on how to use them. However, if the crack is large or the glass is completely shattered, it’s best to avoid attempting any repairs yourself and instead focus on covering the broken area to prevent further damage or injury.
One of the simplest ways to cover a broken car glass is by using clear packing tape. Start by thoroughly cleaning the area around the broken glass to ensure proper adhesion. Then, carefully apply strips of packing tape horizontally and vertically across the broken area, overlapping each strip slightly to create a secure seal. Make sure to press the tape firmly against the glass to ensure it sticks properly. While this method is effective in keeping out rain and debris, it is not a long-term solution and should only be used as a temporary fix until you can get the glass repaired or replaced.
If you don’t have access to clear packing tape, another option is to use a plastic garbage bag. Cut the bag to size, ensuring it is large enough to cover the entire broken area. Place the bag over the broken glass and use strong adhesive tape or duct tape to secure it in place. Again, it’s important to press the tape firmly to ensure a tight seal. This method can provide a temporary barrier against the elements and prevent further damage to your car’s interior.
It’s worth noting that these temporary solutions are not meant to be a permanent fix. It’s essential to get your broken car glass repaired or replaced as soon as possible to ensure the safety of yourself and others on the road. Driving with a broken car glass can impair your visibility and increase the risk of accidents. Additionally, a broken car glass may compromise the structural integrity of your vehicle, making it more susceptible to further damage in the event of a collision.
In conclusion, while it’s always best to seek professional help for car repairs, there are temporary measures you can take to cover a broken car glass until it can be properly repaired. Whether you choose to use clear packing tape or a plastic garbage bag, it’s important to prioritize safety and get the glass fixed as soon as possible. Remember, these temporary solutions are not meant to be a long-term fix, but rather a temporary barrier against the elements until you can get the necessary repairs done.
Step 1: Assess the Damage
The first step is to carefully assess the extent of the damage. Determine whether it’s a small crack, a large crack, or a completely shattered glass. This will help you decide on the appropriate temporary solution and whether it’s safe to continue driving the vehicle.
When assessing the damage, it is important to look for any signs of structural weakness or compromised integrity of the windshield. A small crack may seem insignificant, but it can quickly spread and compromise the overall strength of the glass. On the other hand, a completely shattered glass poses a significant risk not only to the driver but also to other road users. To assess the damage accurately, start by examining the size and location of the crack or shattered glass. Is it a hairline crack or a larger one that extends across the windshield? Is it located near the edges or in the middle of the glass? These factors will help determine the severity of the damage and the appropriate course of action. Next, carefully inspect the surrounding area for any signs of splintering or splintered glass. Sometimes, even a small crack can cause the glass to splinter, creating sharp edges that can be hazardous. If you notice any splintering, it is crucial to take immediate action to prevent further damage and potential injury. Additionally, check if the crack or shattered glass obstructs your view while driving. If it impairs your vision, it is unsafe to continue driving the vehicle until the windshield is repaired or replaced. Driving with impaired visibility not only puts your life at risk but also endangers the lives of others on the road. Lastly, consider the weather conditions and the potential impact they may have on the damaged windshield. Extreme temperatures, such as freezing cold or scorching heat, can worsen the crack or cause it to spread rapidly. Similarly, heavy rain or hail can further compromise the structural integrity of the glass. Taking these factors into account will help you make an informed decision about the next steps to take. Remember, assessing the damage accurately is crucial for determining the appropriate temporary solution and ensuring the safety of yourself and others on the road. If in doubt, it is always best to consult a professional windshield repair or replacement service for expert advice and assistance.
Step 2: Gather the Necessary Tools
Before you begin, gather the necessary tools and materials to cover the broken car glass. Here are some basic home tools you may need:
- Gloves: Protect your hands from any sharp edges or glass fragments by wearing a sturdy pair of gloves. This will prevent any potential injuries and ensure your safety throughout the process.
- Safety goggles: Shield your eyes from any flying debris or glass particles by wearing safety goggles. This will provide an extra layer of protection and prevent any potential eye injuries.
- Masking tape: Use masking tape to mark off the area around the broken glass. This will help you create a clear boundary and ensure that you cover only the necessary section of the car.
- Clear plastic sheet or garbage bag: Find a clear plastic sheet or a large garbage bag that is big enough to cover the broken car glass. This will provide a temporary barrier against rain, wind, and other elements until you can get the glass repaired or replaced.
- Scissors: Have a pair of scissors handy to cut the plastic sheet or garbage bag to the appropriate size and shape. This will allow you to cover the broken glass effectively and securely.
- Duct tape: Use duct tape to secure the plastic sheet or garbage bag over the broken glass. Make sure to apply the tape firmly and evenly to ensure a tight seal and prevent any water or debris from entering the car.
Gathering these tools and materials beforehand will save you time and effort during the process of covering the broken car glass. It is important to have everything ready and easily accessible to ensure a smooth and efficient repair or replacement of the glass.
Step 3: Wear Protective Gear
Before you start working on covering the broken car glass, it’s important to prioritize your safety. Wear gloves to protect your hands from any sharp edges and safety goggles to shield your eyes from flying glass particles.
In addition to gloves and safety goggles, it is also recommended to wear long sleeves and pants to provide extra protection against any potential injuries. Broken glass can be extremely sharp and can easily cause cuts and lacerations if not handled carefully. By wearing long sleeves and pants, you can minimize the risk of direct contact with the glass and reduce the chances of getting injured. Furthermore, it is essential to wear closed-toe shoes or boots while working with broken car glass. This will protect your feet from any glass fragments that may fall to the ground during the repair process. It is important to note that sandals or open-toe shoes should never be worn in this situation, as they offer little to no protection against glass-related injuries. Additionally, consider wearing a dust mask to prevent the inhalation of glass dust and debris. When glass breaks, it can create fine particles that can be harmful if breathed in. A dust mask will help filter out these particles and protect your respiratory system. Lastly, if you are working in a confined space or an area with poor ventilation, it is advisable to use a respirator. A respirator will provide a higher level of protection by filtering out not only glass particles but also any other harmful substances that may be present in the air. Remember, your safety should always be the top priority when working with broken car glass. By wearing the appropriate protective gear, you can significantly reduce the risk of accidents and injuries, allowing you to complete the repair process safely and effectively.
Step 4: Clean the Area
Using a cloth or paper towel, clean the area around the broken car glass. Remove any loose glass fragments or debris to create a clean working surface. This will ensure that the temporary cover adheres properly and minimizes the risk of further damage.
After removing the loose glass fragments and debris, it is important to thoroughly clean the area to ensure that there are no remaining particles that could interfere with the temporary cover. One effective way to do this is by using a glass cleaner specifically designed for automotive use. These cleaners are formulated to remove stubborn stains, dirt, and grime without leaving any residue behind. Before applying the glass cleaner, make sure to read the instructions on the bottle carefully. Some cleaners may require dilution with water, while others can be used directly. Once you have prepared the cleaner as directed, spray it onto the cloth or paper towel and gently wipe the area around the broken glass. Be sure to pay attention to the edges of the broken glass, as this is where small glass fragments are most likely to be lodged. Use a gentle circular motion to remove any remaining debris, taking care not to apply too much pressure that could cause further damage to the surrounding area. In addition to using a glass cleaner, you may also want to consider using a mild detergent or soap solution to further clean the area. This can help to remove any greasy or sticky residue that may have accumulated on the glass or surrounding surfaces. Simply mix a small amount of detergent or soap with water in a bucket or container, and use a clean cloth or sponge to apply the solution to the affected area. Once you have thoroughly cleaned the area, it is important to allow it to dry completely before proceeding with the next steps. This will ensure that the temporary cover adheres properly and provides a secure seal over the broken glass. Taking the time to clean the area around the broken car glass may seem like a small step, but it is an important one. By removing any loose glass fragments or debris and thoroughly cleaning the area, you are setting the foundation for a successful temporary repair. This will not only help to protect your vehicle from further damage, but also ensure your safety and the safety of others on the road.
Step 5: Apply Masking Tape
Take the masking tape and carefully apply it around the edges of the broken car glass. This will help secure the temporary cover and prevent it from shifting or falling off while driving. Make sure the tape is firmly attached to the car’s body and not directly on the broken glass to avoid any damage.
Now that you have covered the broken car glass with a temporary cover, it is important to secure it in place to ensure it doesn’t come loose while you are driving. This is where the masking tape comes in handy. The masking tape will act as an additional layer of support and help keep the temporary cover in place. When applying the masking tape, it is crucial to be careful and precise. Start by tearing off a piece of tape that is long enough to go around the edges of the broken glass. Make sure to clean the area around the broken glass before applying the tape to ensure a strong bond. Gently press the tape onto the car’s body, making sure it adheres firmly and evenly. It is important to avoid placing the tape directly on the broken glass as this could cause further damage. Instead, position the tape around the edges of the glass, creating a secure barrier. As you apply the tape, take your time to ensure it is aligned properly and covers the entire perimeter of the broken glass. This will help prevent any gaps or loose ends that could potentially allow the temporary cover to shift or fall off. Once the masking tape is securely in place, give it a gentle tug to test its strength. If it feels secure and doesn’t budge, you can be confident that the temporary cover is well-protected and will stay in place while you drive. However, if you notice any areas where the tape is loose or not adhering properly, carefully remove it and reapply a new piece of tape. Remember, the purpose of the masking tape is to provide temporary support until you can get the broken car glass properly repaired or replaced. It is not a permanent solution, so it is important to address the issue as soon as possible to ensure your safety and the integrity of your vehicle. In the next step, we will discuss how to safely drive with a broken car glass and what precautions you should take to minimize any potential risks.
Step 6: Prepare the Temporary Cover
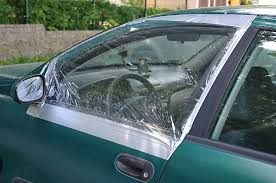
Take the clear plastic sheet or garbage bag and cut it to the size of the broken car glass, leaving a few inches of overlap on all sides. If using a garbage bag, make sure it’s a clear one without any print or color that may obstruct your visibility.
Once you have the plastic sheet or garbage bag cut to the appropriate size, you will need to secure it to the broken car glass. Begin by carefully placing the sheet or bag over the broken area, ensuring that it fully covers the damaged section. The overlap on the sides will allow for a better seal and prevent any water or debris from entering the vehicle. To secure the temporary cover in place, you can use a few different methods. One option is to use clear packing tape to adhere the edges of the plastic sheet or bag to the surrounding intact glass. Make sure to press firmly to create a tight seal. Another option is to use heavy-duty adhesive tape, such as duct tape, to secure the cover in place. This type of tape is strong and durable, making it an ideal choice for temporary fixes. Once the temporary cover is secured, take a moment to inspect it and ensure that it is properly in place. Look for any gaps or areas where the cover may be loose, as these could allow water or debris to enter the vehicle. If you notice any issues, make any necessary adjustments or add additional tape to reinforce the seal. Keep in mind that the temporary cover is just that – temporary. It is not meant to be a permanent solution for a broken car glass. It is important to schedule a repair or replacement as soon as possible to ensure the safety and integrity of your vehicle. Driving with a broken car glass can be dangerous, as it compromises the structural integrity of the vehicle and can hinder your visibility on the road. In conclusion, preparing a temporary cover for a broken car glass is a crucial step in protecting your vehicle until a proper repair or replacement can be made. By following these steps and ensuring a secure seal, you can minimize the risk of further damage and maintain the safety of your vehicle until a permanent solution is implemented.
Step 7: Attach the Temporary Cover
Place the prepared plastic sheet or garbage bag over the broken car glass. Ensure that it completely covers the damaged area and overlaps the surrounding frame. Use duct tape to secure the edges of the cover to the car’s body, making sure it’s tightly sealed to prevent any water or debris from entering.
Now that you have successfully prepared the temporary cover, it’s time to attach it to the broken car glass. Begin by carefully placing the plastic sheet or garbage bag over the damaged area, ensuring that it completely covers the broken glass. Make sure to extend the cover beyond the damaged area and overlap the surrounding frame. This will provide added protection and prevent any further damage. Once the cover is in place, use duct tape to secure the edges of the cover to the car’s body. Start by attaching the tape to one edge of the cover and pressing it firmly against the car’s body. Slowly work your way around the perimeter, applying the tape in small sections and making sure it’s tightly sealed. The duct tape will not only hold the cover in place but also create a watertight seal, preventing any water or debris from entering the car. It’s important to take your time and ensure that the cover is securely attached. Check for any gaps or loose areas, and reinforce them with additional tape if necessary. Remember, the temporary cover is meant to provide a temporary solution until you can get the broken car glass repaired or replaced, so it’s crucial to make sure it’s properly sealed. Once the temporary cover is securely attached, you can have peace of mind knowing that your car is protected from the elements and any potential further damage. However, it’s important to note that this is only a temporary solution, and you should make arrangements to have the broken car glass repaired or replaced as soon as possible. In the next step, we will discuss the importance of seeking professional help to fix the broken car glass and the various options available for repairing or replacing it.
Step 8: Test the Cover
Once the temporary cover is in place, gently press on it to ensure it’s securely attached. Give it a light tug to check if it holds firmly. Additionally, check for any gaps or loose edges that may need additional tape or adjustments.
Testing the cover is an important step to ensure that it is properly secured and will not come off easily. By gently pressing on the cover, you can feel if it is securely attached to the surface. If there is any movement or if it feels loose, it may require some adjustments or additional tape to hold it in place. Giving the cover a light tug is another way to test its stability. If it holds firmly and does not come off with a gentle pull, it is a good indication that it is properly secured. However, if it comes off easily or if there is any movement, it is important to address this issue before proceeding further. In addition to testing the attachment of the cover, it is also important to check for any gaps or loose edges. These can be potential entry points for dust, dirt, or moisture, which can damage the contents underneath. If you notice any gaps or loose edges, it is recommended to use additional tape or make necessary adjustments to ensure a tight seal. Taking the time to thoroughly test the cover before moving on to the next step will help prevent any potential issues or damage. It is always better to address any problems at this stage rather than discovering them later when it may be more difficult to fix. So, make sure to test the cover carefully and make any necessary adjustments to ensure a secure and tight fit.
Driving with a broken car glass can be risky and potentially dangerous. Even with a temporary cover in place, it’s important to exercise caution on the road. The temporary cover may provide some protection against the elements, but it is not a long-term solution. It’s crucial to remember that the broken glass can compromise the structural integrity of your vehicle, making it more susceptible to damage in the event of an accident or sudden impact.
When driving with a broken car glass, it’s advisable to avoid excessive speeds. Higher speeds can increase the risk of the temporary cover coming loose or flying off, leaving your vehicle exposed to the elements. Additionally, driving at high speeds can create vibrations and additional stress on the damaged glass, potentially causing it to shatter further.
Rough roads can also pose a threat when driving with a broken car glass. Potholes, speed bumps, and uneven surfaces can exacerbate the damage and increase the chances of the glass breaking completely. It’s best to avoid roads that are known to be particularly rough or bumpy until the glass is repaired.
While it may be tempting to postpone the repair of the broken car glass, it’s important to prioritize your safety and the safety of others on the road. A professional glass repair or replacement service should be contacted as soon as possible to assess the damage and provide a permanent solution. Delaying the repair can not only put you at risk but can also lead to further damage to your vehicle, resulting in higher repair costs.
Remember, driving with a broken car glass is a temporary solution and should not be relied upon for an extended period of time. Take the necessary steps to get the glass repaired promptly and ensure the safety of yourself and others on the road.
Step 10: Seek Professional Help
Finally, remember that covering a broken car glass with home tools is only a temporary solution. It’s essential to seek professional help from a reputable auto glass repair service to properly fix the damage. They have the expertise and proper tools to assess the situation and provide a long-lasting solution.
When it comes to car glass repair, it’s always best to leave it to the professionals. While you may be tempted to save some money by attempting a DIY fix, it’s important to consider the potential risks and drawbacks. A small crack or chip in your windshield may seem like a minor issue, but it can quickly escalate into a major problem if not addressed promptly and correctly.
Professional auto glass repair technicians are trained to handle all types of glass damage, from small cracks and chips to shattered windshields. They have the necessary knowledge and experience to assess the extent of the damage and determine the best course of action. They will carefully examine the affected area and determine whether a repair or replacement is necessary.
One of the main advantages of seeking professional help is the quality of the repair. Auto glass repair specialists have access to high-quality materials and tools that are specifically designed for repairing car glass. They use advanced techniques and industry-approved methods to ensure that the repair is seamless and long-lasting.
Moreover, professional auto glass repair services offer warranties on their work. This means that if the repaired glass gets damaged again within a specified period, they will fix it free of charge. This gives you peace of mind knowing that you are protected against any future issues.
Additionally, professional auto glass repair services can save you time and effort. Trying to fix the glass yourself can be time-consuming and frustrating, especially if you don’t have the necessary skills and tools. By hiring a professional, you can have the problem resolved quickly and efficiently, allowing you to get back on the road as soon as possible.
Lastly, seeking professional help ensures your safety. A properly repaired or replaced car glass provides structural support to your vehicle and helps maintain its integrity in the event of an accident. DIY repairs may compromise the strength of the glass, putting you and your passengers at risk.
In conclusion, when it comes to car glass repair, it’s always best to seek professional help. They have the expertise, tools, and materials to provide a high-quality, long-lasting solution. Don’t take chances with your safety and the integrity of your vehicle. Contact a reputable auto glass repair service and let the professionals take care of your car glass needs.
1 Cover a Broken Car Glass
S:a